Sump Pump Installation: Essential Steps for Protecting Your Home from Flooding
Sump pump installation is a crucial step for homeowners looking to protect their basements from flooding. A properly installed sump pump can effectively divert water away from the foundation, reducing the risk of moisture damage and mold growth. Understanding the installation process can empower homeowners to make informed decisions, ensuring the longevity and efficiency of their sump pump system.
Many people are surprised to learn that installing a sump pump doesn’t have to be a daunting task. With the right tools and materials, along with a clear step-by-step approach, it can be completed successfully. This blog post will guide readers through the necessary steps and considerations for an effective installation.
Additionally, knowing when to install a sump pump—such as during construction or while renovating a basement—can significantly impact its effectiveness. Homeowners who recognize the signs of potential water issues can take proactive measures, leading to a safer and drier living environment.
Understanding Sump Pump Types and Components
Sump pumps come in various types, each designed to cater to specific needs. Understanding their key components and how to select the right unit is crucial for effective installation and use.
Types of Sump Pumps
- Submersible Pumps
These pumps operate submerged in the water, making them a popular choice for most residential basements. They are efficient at removing large volumes of water and are typically quieter than other types. - Pedestal Pumps
Unlike submersible pumps, pedestal pumps have the motor mounted above the sump basin. This design keeps the motor dry, allowing for easier maintenance. They are best suited for smaller volumes of water. - Battery Backup Pumps
Battery backup pumps act as secondary systems. They engage when the primary pump fails or during power outages. This ensures continued operation and protection against flooding.
Key Components
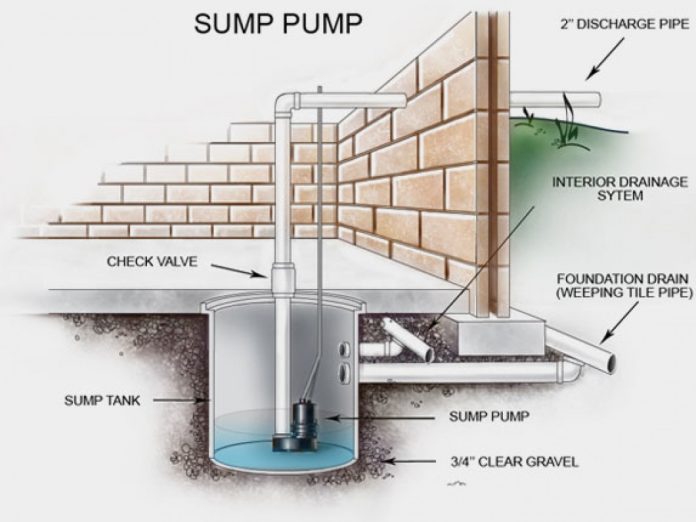
- Sump Basin
This is the container where water collects before being pumped out. A durable basin made from polyethylene or fiberglass is essential for long-term use. - Pump Switch
This component activates the pump when the water reaches a certain level. Common types include float switches and electronic switches, which provide reliable operation. - Discharge Pipe
The discharge pipe carries water away from the sump. Proper sizing and installation are crucial to prevent clogs and ensure efficient water removal. - Check Valve
Placed in the discharge pipe, a check valve prevents water from flowing back into the sump after pumping. This protects the pump and maintains a dry area.
Selecting the Right Sump Pump for Your Needs
When choosing a sump pump, several factors should be considered.
- Water Volume
Assess how much water needs to be removed. Submersible pumps are ideal for larger amounts, while pedestal pumps suffice for minimal water. - Depth of the Sump
The depth will affect the type of pump suitable for installation. A deeper sump may require a more powerful submersible unit. - Power Source
Consider pumps powered by electricity or those with battery backups for areas prone to power outages. Battery backups provide enhanced reliability. - Pump Capacity
Look at the pump’s GPM (gallons per minute) rating. Ensure it meets the specific requirements to handle water removal effectively.
Sump Pump Installation Guide
A successful sump pump installation involves careful preparation and adherence to safety protocols. The following guide covers essential steps for effective installation, along with tips for testing and maintaining the system.
Preparation and Safety Considerations
Before installation, gather all necessary tools and materials. This includes the sump pump, PVC piping, a check valve, a sump basin, and tools like a drill, pipe wrench, and level. It’s also important to ensure that the work area is clean and free from hazards.
Safety should be a top priority. Wear protective gear, including gloves and goggles, to guard against injuries. Ensure the area is well-ventilated if working near electrical components. Turn off any power sources to avoid electrocution during installation.
Step-by-Step Installation Process
- Select a Location: Choose a low spot in the basement or crawl space, away from walls and potential leaks. The location should allow for proper drainage.
- Dig the Basin Hole: Excavate a hole deep enough for the sump basin. The basin should sit below the area’s water level to efficiently collect water.
- Install the Basin: Place the sump basin into the hole and ensure it’s level. Backfill around the basin with gravel to promote drainage.
- Connect the Pump: Fit the pump inside the basin. Attach a check valve to the discharge pipe to prevent backflow.
- Run the Discharge Pipe: Route the discharge pipe away from the foundation. Ensure it slopes downward for effective drainage. Seal connections with PVC cement.
- Attach the Power Source: Connect the pump to a GFCI outlet to prevent electrical issues. Secure any loose wires and ensure water resistance.
Testing and Maintenance
After installation, it’s crucial to test the sump pump. Pour water into the basin to activate the pump. Verify that the pump operates correctly and discharges water away from the foundation.
Regular maintenance ensures longevity. Check the pump every few months for debris. Clean the sump basin and test the pump functionality.
If the pump is submerged, ensure it’s not exposed to water on electrical parts. Consult the manufacturer’s instructions for specific maintenance recommendations.


